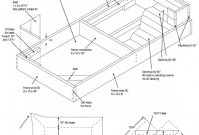
Sandbox/Pool/Playdeck
Dimensions:
48” wide X 99” long
9 1/2” high at open end – 22” high at bench
Sandbox / pool space: 45” wide x 50 1/2” long
Lumber Required:
NOTE: Because the playdeck will come in contact with the ground, it should be built using only pressure-treated lumber. This will ensure maximum durability.
Material Length Number of pieces
2”x10” 8 feet 4
2”x2” 6 feet 1
2”x4” 8 feet 2
5/4”x6” 8 feet 8
Materials List:
- 8d, 12d hot-dipped galvanized nails*
- Two 3” hinges*
- Water resistant sealant
- For sandbox only: 400 lb play sand, 48” x 54” tarp or pressure-treated plywood
- For pool only: 2 additional 8’ 2”x2”s
- Minimum 7’x7’ square of 6-mil reinforced plastic tarp for pool liner
* Metal products in contact with wood must be corrosion resistant.
Tools Needed:
- Circular or cross-cut saw
- Hammer
- Drill
- Mitre saw
- Carpenter’s square
- Level
- Razor knife
- Carpenter’s rule or tape
-
Construction:
Refer to construction diagram during assembly
Step 1:
Precut the wooden pieces for assembly as follows:
Cut two 48” frame ends from an 8’ 2”x10”
Cut one 45” frame crosspiece and two 21” bench ends from another 2”x10”
Cut one 42” brace from an 8’ 2”x4”
Cut three 44” joists from another 8’ 2”x4”
From the 5/4”x6” boards cut:
-
12 deck 45” deck pieces
-
Two 47” deck pieces
-
Two 21 3/4” seat pieces
-
Two 10 3/4” seat pieces
If adding plywood bottom for sandbox, cut frame sides 93” long
Step 2:
Connect 2”x10” frame sides to frame ends and secure using 12d nails.
Step 3:
Position eight 45” decking pieces side by side to determine the required length of the joists and the position of the frame crosspiece. Position and nail the crosspiece between the frame sides using 12d nails.
If attaching a plywood bottom, nail the full sheet of plywood under the entire frame of half the sheet under the sandbox end.
Step 4:
Place the frame on level ground, preferably where it will sit. If you are not using the plywood bottom, lay the tarp underneath the frame and trim off the excess.
Step 5:
Nail both 21” 2”x10” bench ends in each outer corner at the platform end of the frame using 8d nails.
Step 6:
Nail 2”x4” joist to crosspiece and frame end. Then position the 2”x4” outer joists 1” below the top of the frame on the upright bench ends and nail them in place with 8d nails.
Step 7:
Cut 3” off the end of two 45” decking pieces. Form the bottom of the storage bench by laying the two strips across the joists between the bench ends.
Step 8:
Lay the remaining 6 deck boards across the joists and attach with 8d nails. To avoid splitting the boards, pre-drill nail holes near the end of the deck boards.
Step 9:
Using 8d nails, nail 42” 2”x4” brace to the back of the bench and between bench ends flush with the frame top.
Step 10:
Build the bench lid by cutting two 7 1/2” braces from 2”x2”s to form slanted ends. Hold lid boards flat, side by side. Centre the braces, long edge down, about six inches from each end and nail in place. Use 3” hinges to attach lid to base.
Step 11:
Refer to seating diagram to cut the seat pieces and ensure the direction of the 45-degree angle cut is correct. Use a mitre saw angled at 45 degrees to trim the corners of the 10 3/4” and 21 3/4” seat pieces. Cut two 12” 2”x2” cleats and two 13 1/2” 2”x2” cleats and use 8d nails to secure them inside the two outer corners of the sandbox / pool area one inch below the top edge.
Step 12:
POOL ONLY - SEE WADING POOL DIAGRAM
Lay the tarp inside the pool with the sides overlapping the frame. Smooth the material out and gather the excess at the corners. Cut 20” long flaps at the seat corners. Cut and nail 2”x2”s on the inside top of the pool perimeter. Ensure the 2”x2”s are flush with the top edge and over the tarp to hold it in place except at the seat-corners. Trim the tarp flush with edge, gathering long corners up under seat above the water line.
Step 13:
Apply water-repellant paint or sealer to all exposed surfaces. Let dry thoroughly before filling with sand or water.
Final Note: When the sandbox/pool is not in use, cover it with a tarp to protect the sand/water from contamination. For safety, you should consider draining water from the pool when not in use by pulling down the seat corner flaps or using a hose to siphon the water.


